

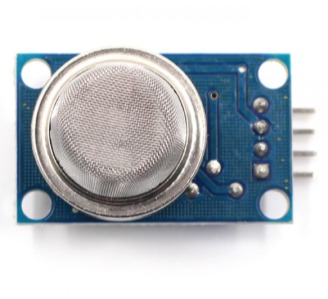
Description
Here’s a step-by-step tutorial on how to connect an MG811 CO2 sensor module to an Arduino: Step 1: Gather the Required Equipment: Arduino board (such as Arduino Uno) MG811 CO2 sensor module Breadboard Jumper wires Step 2: Understand the MG811 CO2 Sensor Module: The MG811 is a carbon dioxide (CO2) sensor that measures the concentration of CO2 gas in the air. It has four pins: VCC (power supply), GND (ground), OUT (analog output), and A-REF (analog reference voltage). The VCC pin is used to provide power to the sensor (typically 5V). The GND pin is connected to the ground of the circuit. The OUT pin provides an analog output voltage that represents the concentration of CO2 gas. The A-REF pin is used to set the analog reference voltage, which can be set to VCC or an external reference voltage. Step 3: Connect the MG811 CO2 Sensor Module to the Breadboard: Insert the MG811 CO2 sensor module into the breadboard so that its pins are on separate rows. Connect the VCC pin of the sensor to the 5V pin on the Arduino board using a jumper wire. Connect the GND pin of the sensor to the GND pin on the Arduino board using a jumper wire. Connect the OUT pin of the sensor to any analog pin on the Arduino board, such as A0, using a jumper wire. Connect the A-REF pin of the sensor to the 5V pin on the Arduino board using a jumper wire to set the analog reference voltage to VCC. Alternatively, you can connect it to an external reference voltage if desired. Step 4: Read CO2 Concentration with Arduino: Open the Arduino IDE software on your computer and create a new sketch. Copy and paste the following code into the sketch: #define CO2_PIN A0 // Pin number to which the MG811 CO2 sensor module is connected void setup() { Serial.begin(9600); // Start serial communication at 9600 bps } void loop() { int sensorValue = analogRead(CO2_PIN); // Read analog value from the sensor float voltage = sensorValue * 5.0 / 1023.0; // Convert analog value to voltage (assuming 5V reference voltage) float ppm = voltage * 2000.0 – 200.0; // Convert voltage to CO2 concentration in parts per million (ppm) Serial.print(“CO2 Concentration (ppm): “); Serial.println(ppm); // Print CO2 concentration to serial monitor delay(1000); // Wait for 1 second } Verify and upload the code to your Arduino board. Open the Serial Monitor in the Arduino IDE to see the CO2 concentration readings. The CO2 concentration will be displayed in parts per million (ppm) in the Serial Monitor. That’s it! You have successfully connected and read CO2 concentration using an MG811 CO2 sensor module with an Arduino. You can now use this information for various applications that require monitoring of CO2 concentration, such as indoor air quality monitoring, greenhouse control, and ventilation control projects.
Reviews
There are no reviews yet.